3 Exciting Holiday DIY Activities to try with your Family
The holiday season is upon us! It is time to get your home looking festive. But don’t worry, decorating doesn’t have to be a hassle. We have 3 fun, unique, and easy DIY projects that will bring the holiday spirit into your home. All of these projects are functional for your home. Bring your family together and have a jolly time putting these together!
____________________________________________________________
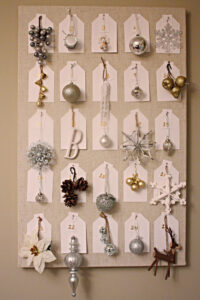
How to Make a Christmas Advent Calendar
An ornament advent calendar serves as a festive decorative piece to have in your home but also as a fun activity for your kids to decorate your christmas tree. Each day of the month will have its own fun ornament that can be hung up on your tree! This activity is expected to take 2 hours.
Materials:
- A wooden board (size of your choice to fit the size of your ornaments)
- 24 Nails
- 24 Ornaments
- 24 Paper Key Tags
- Hammer
- Ribbon
- Yard Stick
- Pencil
STEP 1: Measure and design your board
- Lay the board flat, and lay the yardstick across the board.
- Make marks at 4, 8, 12 and 16 inches with the pencil.
- Continue to do this across each board.
STEP 2: Add nails
- Nail one nail in each of the spots you have measured and marked.
- You should end up with 24 nails in total.
STEP 3: Add Dates
- Use the paper key tags to add dates to the calendar.
- Write out the numbers 1 through 24 on the tags.
- Attach the tags to the ornaments to coordinate with each day of Advent.
STEP 4: Hang your Ornaments
- Using the ribbon, hang your ornaments in order upon your board
How to Make a Star Christmas Card Holder
A card holder is a festive way to showcase all the cards you’ll be receiving this holiday season! Grab your family and have some fun making something everyone can share. This activity will only take 2 hours!
Materials:
- A wooden board of your size of choosing (can be purchased from your local hardware store)
- 5 – Nails
- Hammer
- Clothes Pin
- Ruler
- Pencil
- Twine
STEP 1: Measure the Star
- Use the five nails to hammer in the points of the star, being careful not to hammer the nails in all the way. Leave about ½ inch of nail exposed above the board.
STEP 2: Create the Star
- Use your twine to create the star shape. Start by tying your twine to the bottom left nail.
- Take the twine up and wrap it around the top nail, down to the bottom right nail, up to the left middle nail, then across to the right middle nail.
- Finally, take the twine back to the bottom left nail and tie it in place.
STEP 3: Add your Cards
- Using the clothes pins attach your cards to the star!
How to Make a Stocking Hanger Box
Make this DIY wooden box and attach it to your mantel for an easy way to display your stockings, or fill it with other holiday decorations and use it as a display for your mantel during the holidays! This activity will take approximately 2 hours.
Materials:
- One 1” x 6” x 8’ length of common whitewood (can be purchased and cut from your local hardware store)
- One 3-pack of heavy-duty coat and hat hooks
- A package of #6 ¾” screws
Tools:
- Circular Saw
- Brad nailer and 1 – ¾ “ Brad Nails
- Drill and ⅛” Drill Bit
- Measuring Tape
- Carpenter’s Square
- Clamps
- Pencil
- Sanding Block
- Safety Goggles
Optional Materials
- Paint, Paint Brush, and Latex Gloves
STEP 1: Measure, Mark & Cut
- Measure and mark cuts on the 1- x 6-inch x 8-foot common board according to the cut list.
- Cut on the common boards with a circular saw
- This can be done or completed by someone at your local hardware store.
STEP 2: Paint or Stain Boards
STEP 3: Assemble Box Sides
- Lay one 23-inch section down
- Stand two remaining 23-inch sections next to either side of the base.
- Secure with brad nails.
STEP 4: Assemble Box Ends
- Stand both 7-inch sections on each end of the box to complete.
- Secure with brad nails.
STEP 5: Attach your Hooks
- Once your box is complete attach hooks using ¾ – inch wood screws.
At OneContact we hope you have a fun, thrilled holiday season. Just remember we are always there to make sure your home feels safe, comfortable and cozy. Be sure to explore our website, Instagram, or Facebook to learn more about what we do. Proactive maintenance means a happy home!


Recent Comments